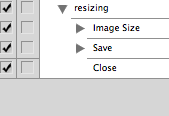
We were given a set of images to work with for the workshop. The first thing we had to do was resize the images, which could have been done one-by-one, but because of the amount we had it was unnecessary.
So:
-First place one of the images into Photoshop for resizing.
-Before changing the image size you must select the 'Actions' toolbar from the 'Window' menu.
-Select a new action and press 'record' as below.

- Once you are recording you resize the pixel width to '720'.
- Then save the image.
- Then close the image.
- Next you must click 'File', down to 'Automate' then onto 'Batch' and select where the work is coming form and where it will be saved.
- Once saved close Photoshop and open Quicktime Player 7 and select 'Open image sequence' and enter the location of the Photoshop files just saved.
- Select 'Open' and a frames per second option will pop-up. (This works by trial and error so select an option in the middle to begin with to check it out)
Untitled from Charlotte Bourke on Vimeo.


No comments:
Post a Comment